Measure the real desk before choosing
Start with the clamp zone, not the product photo. A rear lip, cable tray, modesty panel, or thick beveled edge can block a C-clamp that looks perfect online. Measure desktop thickness, distance from the wall, and the space needed for monitor arms to swing without scraping shelves or acoustic panels.
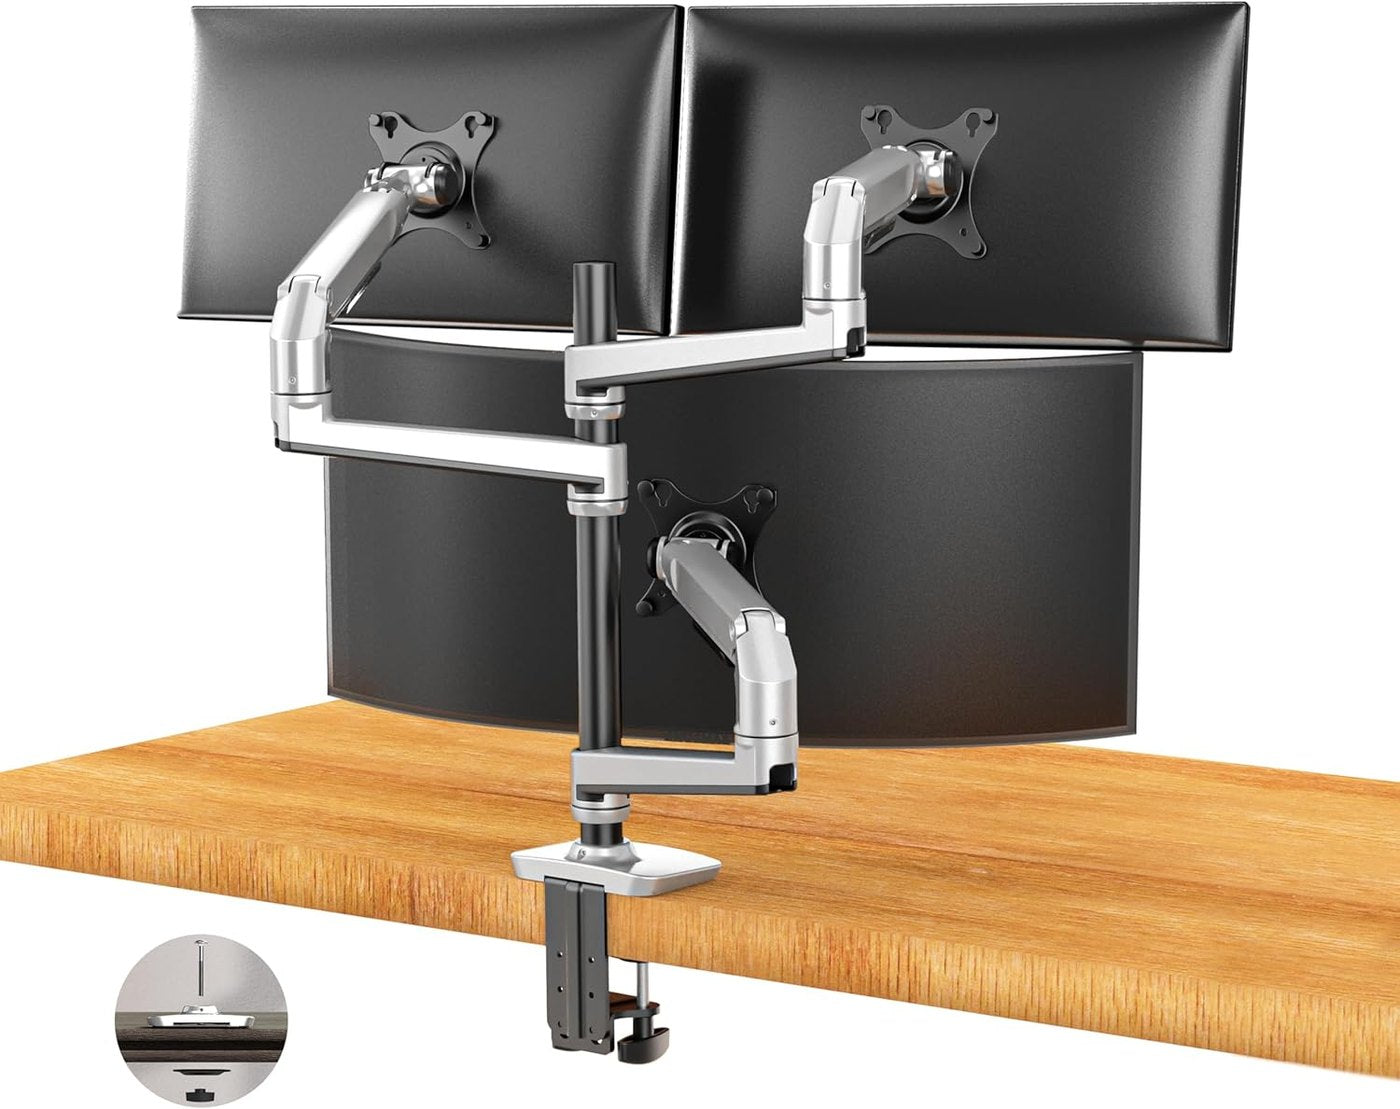
For mounting safety, weight limits, and daily stability, apply this note in a practical way: write down the screen sizes, the heaviest display, the desk depth, and the accessories that must stay within reach. Then picture the first ten minutes of installation and the last ten minutes of a busy workday. A stand is doing its job when the displays remain aligned, cables are quiet, and the desktop still has space for notebooks, chargers, and quick review tasks.
Match weight ratings with margin
Monitor weight ratings usually exclude the original stand, but buyers still need a safety margin. Two 27-inch screens with heavy panels can feel very different from two thin office displays. A better stand leaves room for small upgrades, holds tilt without sagging, and does not need every joint tightened to the limit.
For mounting safety, weight limits, and daily stability, apply this note in a practical way: write down the screen sizes, the heaviest display, the desk depth, and the accessories that must stay within reach. Then picture the first ten minutes of installation and the last ten minutes of a busy workday. A stand is doing its job when the displays remain aligned, cables are quiet, and the desktop still has space for notebooks, chargers, and quick review tasks.
Plan eye line and neck comfort
The top third of the main screen should sit near eye level for most seated work. Portrait side screens, stacked displays, and ultrawide panels need extra thought because a tidy setup can still create neck rotation. The strongest layouts keep the most-used screen centered and place reference screens where glances feel natural.
For mounting safety, weight limits, and daily stability, apply this note in a practical way: write down the screen sizes, the heaviest display, the desk depth, and the accessories that must stay within reach. Then picture the first ten minutes of installation and the last ten minutes of a busy workday. A stand is doing its job when the displays remain aligned, cables are quiet, and the desktop still has space for notebooks, chargers, and quick review tasks.
Check VESA and included hardware
Most office monitors use 75x75 or 100x100 VESA plates, but recessed mounts and curved backs may need spacers. Before buying, confirm screw depth, plate access, and whether quick-release brackets are included. Good hardware saves time during installation and makes later screen swaps less stressful.
For mounting safety, weight limits, and daily stability, apply this note in a practical way: write down the screen sizes, the heaviest display, the desk depth, and the accessories that must stay within reach. Then picture the first ten minutes of installation and the last ten minutes of a busy workday. A stand is doing its job when the displays remain aligned, cables are quiet, and the desktop still has space for notebooks, chargers, and quick review tasks.
Keep cables serviceable
Cable clips are useful only when they still allow movement. Leave a small service loop near each hinge, route power bricks where heat can escape, and avoid tying every cable into one rigid bundle. A stand that looks clean on day one should also let you replace a webcam, dock, or USB hub without dismantling the desk.
For mounting safety, weight limits, and daily stability, apply this note in a practical way: write down the screen sizes, the heaviest display, the desk depth, and the accessories that must stay within reach. Then picture the first ten minutes of installation and the last ten minutes of a busy workday. A stand is doing its job when the displays remain aligned, cables are quiet, and the desktop still has space for notebooks, chargers, and quick review tasks.
Think about daily adjustments
Some people set monitors once and never touch them; others shift screens for calls, spreadsheets, drawing tablets, or shared viewing. Gas-spring arms help with frequent movement, while a rigid crossbar can be better for fixed symmetrical layouts. The right choice depends on how often the desk changes during a normal week.
For mounting safety, weight limits, and daily stability, apply this note in a practical way: write down the screen sizes, the heaviest display, the desk depth, and the accessories that must stay within reach. Then picture the first ten minutes of installation and the last ten minutes of a busy workday. A stand is doing its job when the displays remain aligned, cables are quiet, and the desktop still has space for notebooks, chargers, and quick review tasks.
Protect the work surface
A reinforcement plate can spread pressure on thinner desktops, especially with heavy dual-arm stands. Glass, hollow-core, and soft wood desks need extra caution. If the desk flexes when you type or lean on it, choose a lighter layout, add support, or use a freestanding base that spreads weight more evenly.
For mounting safety, weight limits, and daily stability, apply this note in a practical way: write down the screen sizes, the heaviest display, the desk depth, and the accessories that must stay within reach. Then picture the first ten minutes of installation and the last ten minutes of a busy workday. A stand is doing its job when the displays remain aligned, cables are quiet, and the desktop still has space for notebooks, chargers, and quick review tasks.
Balance looks with repairability
A beautiful monitor wall is less useful if every adjustment requires two people. Favor designs with reachable tension screws, labeled parts, and standard plates. The best multi-monitor stands disappear visually because they keep screens aligned, but they remain easy to inspect when something loosens months later.
For mounting safety, weight limits, and daily stability, apply this note in a practical way: write down the screen sizes, the heaviest display, the desk depth, and the accessories that must stay within reach. Then picture the first ten minutes of installation and the last ten minutes of a busy workday. A stand is doing its job when the displays remain aligned, cables are quiet, and the desktop still has space for notebooks, chargers, and quick review tasks.
When comparing final candidates, keep the LeStallion roundup for best multi-monitor stands open so weight limits and desk-fit details stay easy to check.
Final fit rehearsal before ordering
Before committing to a multi-monitor stand, run one last rehearsal with painter tape or paper markers on the desktop. Mark the clamp position, the expected screen edges, the keyboard center line, and the path for power and display cables. This simple dry run catches conflicts that spec sheets hide, such as a monitor arm hitting a shelf, a laptop dock losing airflow, or a webcam cable becoming too short when the screen rises. It also helps teams buying for several desks create a repeatable standard instead of guessing from one attractive product photo.
For professional spaces, consistency matters as much as strength. A stand that works across shared offices should be easy to install, easy to explain, and forgiving when different employees prefer slightly different monitor heights. For home offices, the winning choice is often the model that gives enough adjustment without making the desk feel mechanical or crowded. Keep receipts, spare screws, Allen keys, and VESA adapters together after installation so future changes do not turn into a scavenger hunt.
Finally, review how the stand will feel during maintenance. Dusting behind screens, plugging in a temporary HDMI cable, changing a monitor angle for a video call, or moving the desk for cleaning should not require rebuilding the whole workstation. That everyday serviceability is often what separates a merely strong mount from a monitor stand people keep using comfortably for years.
For the previous cloud support article in this editorial chain, see the row 261 office chair buying guide. It is linked here near the end so the main recommendation flow stays focused on monitor stand fit.